
I’ve always believed that the most delicious preservation recipes are those that don’t require sterilization or hours of tireless work. And these quick pickled tomatoes are exactly that. They are a true summer and autumn treasure that I prepare every year. They pair perfectly with new potatoes, complement any meat dish, and serve simply as a stand-alone, spicy appetizer.
I love this version because it’s simple, but the tomatoes turn out absolutely magical: with a slight tanginess, a pleasant heat from the horseradish and garlic, and an incredible aroma of dill. In my family, we start making this dish as soon as the first ripe tomatoes appear, and I’m sure this recipe will become a favorite in your household too.
Ingredients
| Product | Quantity | Notes |
| Water (cold) | 1 L | For preparing the brine |
| Salt | 2 tbsp. | I use coarse, non-iodized salt |
| Sugar | 1 tbsp. | Balances the flavor and aids fermentation |
| Mustard powder | 1 tbsp. | Adds a pungent kick and helps preserve the tomatoes |
| Horseradish leaves or root | To taste | For aroma and crunch |
| Garlic | 4–6 cloves | An essential ingredient! |
| Dill (dried heads/umbels) | 1–2 pcs. | Provides the classic fermented aroma |
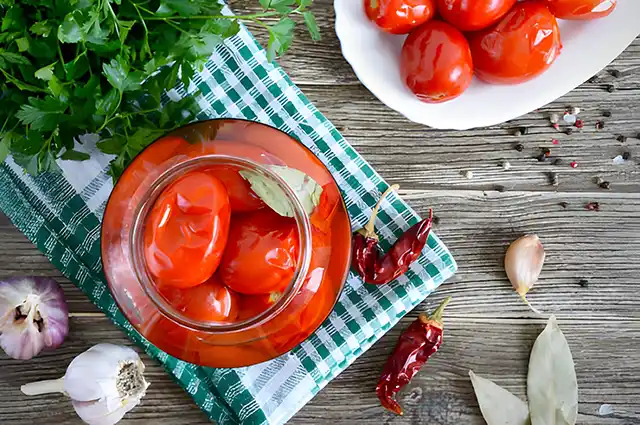
| Tomatoes | As many as fit in the jar | It’s best to choose small, firm ones |
Step-by-Step Instructions
Step 1: Prepare the Aromatic Brine
I start with the brine because it must be absolutely cold. In one liter of cold water, I completely dissolve the salt, sugar, and mustard powder. I check to make sure no crystals are left at the bottom, and then set it aside. I like this option because mustard powder adds a special nuance and piquancy to the dish.
Step 2: Layer the Spices
I take a clean jar—whatever volume I need right now. At the bottom, I always put horseradish leaves or a small piece of the root, 1–2 dried dill heads (they are incredibly fragrant!), and, of course, the garlic cloves. I always add a bit more garlic than in classic recipes because we love it so much.
Step 3: Pack the Tomatoes
This is the most enjoyable stage. I tightly, but gently, pack the tomatoes into the jar. I try to choose small or medium fruits so they are roughly the same size and fit well. The tighter you pack them, the more tomatoes will fit, and the better they will ferment.
Підписуйтесь, щоб не пропустити нічого цікавого! | Follow us so you don't miss anything interesting! | Subskrybuj, aby nie przegapić niczego ciekawego!
Step 4: Pour and Wait
I pour the prepared brine over the tomatoes up to the very top. I cover the jar with a standard plastic cap or even a simple lid, but do not seal it airtight! This is crucial because the tomatoes need to ferment. I leave the jar in the kitchen at room temperature for exactly 3 days.
Step 5: Transfer to the Cold
After 3 days, when a characteristic sour smell and a slight foam appear, I transfer the jar to a cold place—the refrigerator or a cellar. You can actually start tasting the fermented tomatoes after 3–4 days, but they become their most delicious after a week in the cold. I am convinced that this recipe will become a favorite in your family because it doesn’t require much time.
Tips and Variations
- For extra heat: Try adding a small piece of hot chili pepper (literally 1–2 thin rings) to the spices at the bottom of the jar.
- Ingredient substitutes: If you don’t have fresh dill heads, you can use 1 teaspoon of dill seeds, although fresh dill provides a stronger aroma. Horseradish root can be substituted with leaves, or vice versa.
- Tomato variety: I prefer to make this dish with “Roma” or “plum” tomatoes—they are firm, don’t get mushy, and hold their shape beautifully.
- Secret ingredient: Sometimes I add 2–3 cherry or currant leaves. They contain tannins that make the tomatoes even crunchier.
Just a few simple steps and three days of waiting, and delicious, crunchy, perfectly pickled homemade tomatoes will appear on your table. They taste excellent as an appetizer, a side dish, or an accompaniment to potatoes, grains, and meat. I highly recommend you try it!
A Brief History of the Dish
Vegetable pickling (fermentation) is one of the oldest methods of preservation known to humankind for thousands of years. This technique was widespread in many cultures, especially where it was necessary to preserve vitamins and food for the long winter.
Unlike vinegar-based marinades, pickling relies on the natural process of lactic acid fermentation. Bacteria convert the sugars contained in the vegetables into lactic acid, which acts as a natural preservative. It is this acid that gives pickled products their characteristic tangy flavor and ensures their long-term storage. Our recipe is a modern, quick variation of traditional pickling.
Preparation Time
- Active prep time: 15 minutes
- Total preparation time (to readiness): 3 days at room temperature + 4 days in the cold (7 days total for ideal flavor)
Calorie Count
Approximate calories (per 100g): 25–30 kcal.